Raspberry Pi MJPEG at ~30fps
I’ve been tackling the Pi Camera recently and looking for the best trade off of performance, quality, bandwidth, simplicity and fields of view.
During my travels I experimented with a large number of command line options, raspivid, raspistill and VLC. I was looking for the simplest way to get to what I wanted and finally settled on the following.
First, I quickly abandoned using raspistill and raspivid – frames per second weren’t up to it at anything like a resolution I was happy with.
The idea was to use the camera for two things. First, streaming video at 1080p, second, taking screenshots each minute. To achieve that I settled on the Video For Linux 2 module that I edited in to my boot sequence by adding the following to the /etc/modules file. This loads the module so I don’t have to do a modprobe.
|
1 |
bcm2835-v4l2 |
Then you’ll want VLC which is readily available in a repo so just:
|
1 |
sudo apt-get install vlc |
Once they’re installed, the following command line will give you 1080p MJPEG encoded video at ~30fps. The result of this is that the stream comes down at about 50Mbps so WiFi isn’t going to cut it.
|
1 |
cvlc --no-audio v4l2:///dev/video0 --v4l2-width 1920 --v4l2-height 1080 --v4l2-chroma MJPG --v4l2-hflip 1 --v4l2-vflip 1 --sout '#standard{access=http{mime=multipart/x-mixed-replace;boundary=--7b3cc56e5f51db803f790dad720ed50a},mux=mpjpeg,dst=:8554/}' -I dummy |
You can use VLC to connect to the network stream on http://[ip of raspi]:8554/ – on a Raspberry Pi 2, this uses all of ~15% CPU to generate the stream since it’s MJPEG to MJPEG (see the chroma specifier?) and we’re not doing any transcoding.
50 MEGABITS PER SECOND?! ARE YOU NUTS? Well, I see where you’re coming from. From a bandwidth usage perspective, this isn’t great BUT it does demonstrate how you can get far better frame rates with motion JPEG than you can with another piece of software that is very popular and requires you to build from source. Granted, building it is simple but ~5fps @ 640×480? Meh.
If however you just want decent quality and it doesn’t need to be in MJPEG format, go for this command line instead which is h264. I should add that even though I’ve left it here, the –v4l2-fps option doesn’t work in the version of VLC that’s provided from the default repositories. [EDIT] Use: v4l2-ctl -p <fps> instead before starting up VLC [/EDIT] I may look to build VLC from source if I feel I want better frame rate control. For now, a default 30fps is something I’m happy with and I’d only ever reduce it to 25fps anyway. Despite trying, it doesn’t look to be possible to capture and encode to h264 at 2592×1944 as the hard coded limiting width is 2048 for h264. 1920 is already about as close to that as you need to be.
|
1 |
cvlc --no-audio v4l2:///dev/video0 --v4l2-width 1920 --v4l2-height 1080 --v4l2-chroma h264 --v4l2-fps 30 --v4l2-hflip 1 --v4l2-vflip 1 --sout '#standard{access=http,mux=ts,dst=:8554}' -I dummy |
To spruce it up a little more, and since we’re using the V4L2 module, we can add some sharpness and increase the bitrate by using this command before we start up our stream. Here I’m setting sharpness to 30%, JPEG compression quality to 100 (not really needed here), video encoding to a constant bitrate and finally setting the bitrate at about 25Mbps – the intelligent among you can tinker with this to reduce the bitrate as you wish without needing to transcode, saving CPU cycles.
|
1 |
v4l2-ctl -c sharpness=30,compression_quality=100,video_bitrate_mode=1,video_bitrate=25000000 |
Yes, it’s all just command lines but building these has taken some testing, trial and a lot of error.
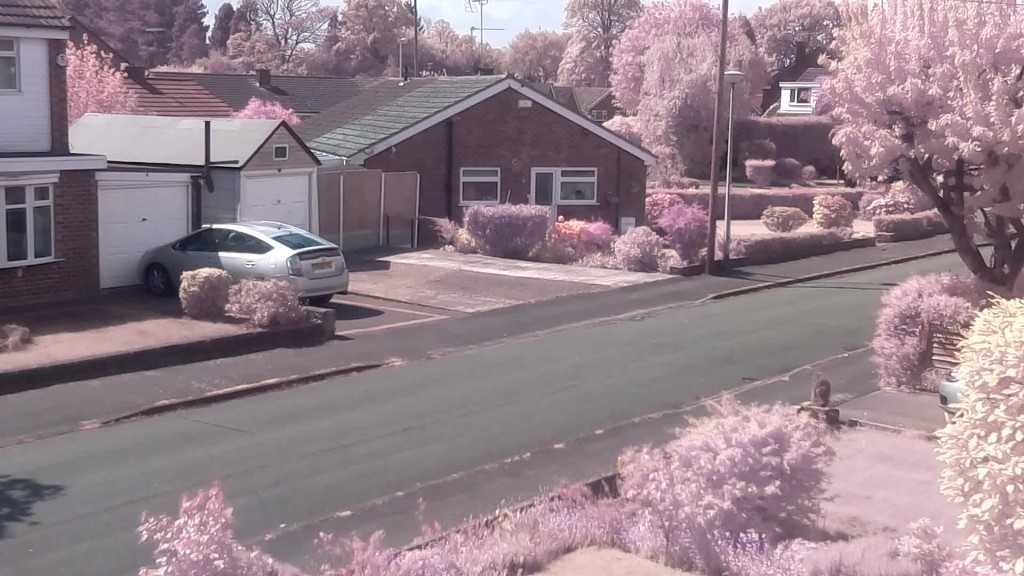
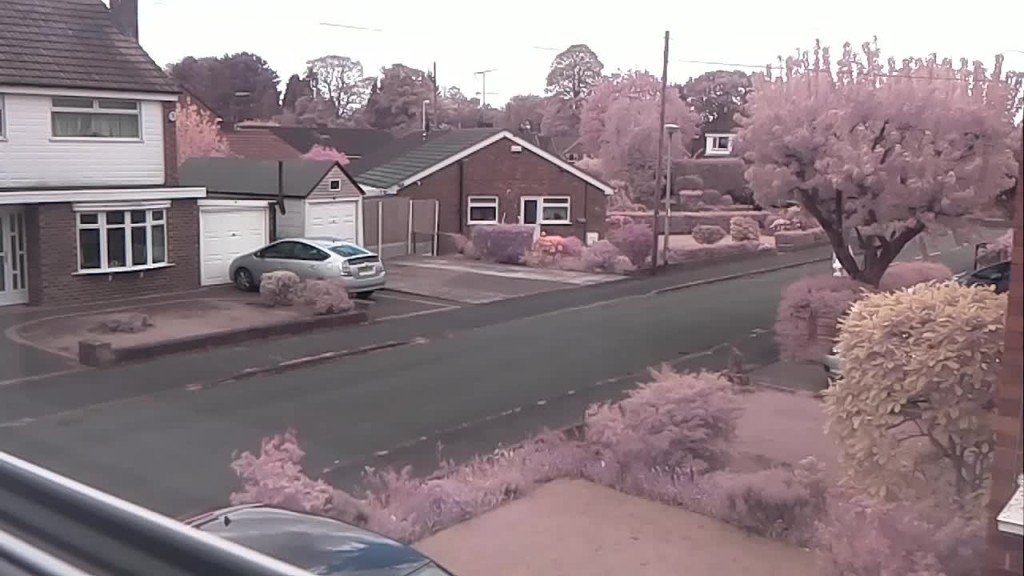
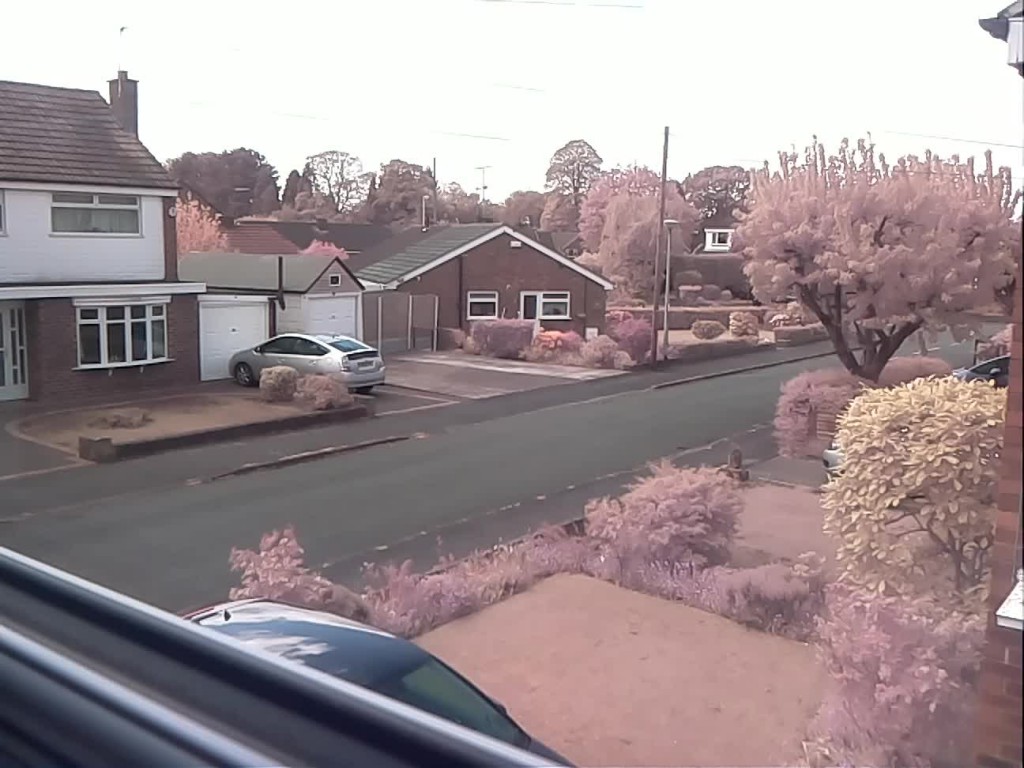
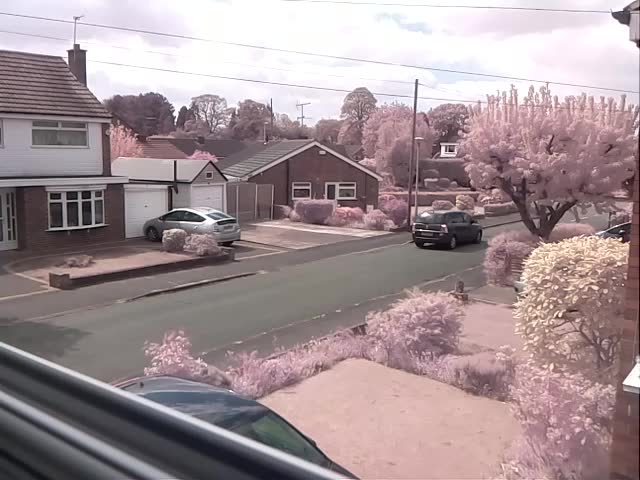
So, what about field of view? When I say field of view, I’m talking about the frame of the sensor. The Pi Camera’s full frame is 2592 x 1944 pixels but generally when we’re streaming video it’ll be a 4:3 or, more likely a 16:9 ratio such as 1280×720 (720p HD) or 1920 x 1080 (1080p Full HD). The Pi Camera has some…foibles when it comes to choosing the right width and height of the frame. If I set the video to 1920 x 1080, the picture is cropped which results in a zoomed in effect. For indoor cameras, this is detrimental and would barely be useful for picking up the far wall in a typical sized room. For cameras positioned outside, it’s not so bad but the subject still has to be a decent distance away. I’ve shown some example frame grabs from the streaming video (not a still shot, that’s a different field of view even when the width and height are set the same as a video!) below so you can see what I’m talking about.
1920×1080
1280×720
1296×972
640×480
What was the point of all this investigation? Well, as mentioned, I wanted to capture still frames but I didn’t want to have to have either full motion video or still frames. I wanted the ability to connect to, and watch the stream whenever I want however I also want to be able to capture frames automatically each minute as stills. Selecting the best quality of video to stream at and keeping quality up meant I wasn’t losing too much detail in the stills.
Combined with a compiled version of ffmpeg, this command line connects to the stream and grabs a frame – it’s how I got the example shots above and it can be executed on the Raspberry Pi.
|
1 |
./ffmpeg -y -i http://[ip of raspi]:8554/ -r 1 -vframes 1 now.jpg |
This command line (executed from a PC with enough power) will record 30 seconds of video from the stream.
|
1 |
ffmpeg -i http://[ip of raspi]:8554/ -t 30 out.mp4 |
Update: September 2015
I’ve made a few small edits to this article to reflect my changing needs and have also done more command line fettling.
The extremely poor field of view with the Pi Camera at 1920×1080 was frustrating me so I actually went and purchased a wide angle lens for the Pi Camera from http://www.uctronics.com/. I think it was specifically the LS-27225 2.1mm lens. You may also need to buy an appropriate mount for the Raspberry Pi camera module and you need to be prepared to dismantle the Pi camera and fixed focus lens.
So, as mentioned, I was frustrated with the extremely poor field of view at 1080p. Even after I’d fitted the new lens and focused it, the FOV was still not good enough. The cropping done was infuriating so the only real solution was to see what worked.
For free, I can tell you that if you attempt to stream anything above 1080p with h264 in VLC (as of today anyway) – it will just not work.
In order to achieve full frame, I was forced to use the MJPEG pixel format which, while it allows increased resolution use in VLC, it actually limits the Pi Camera’s frame rate to <15fps. It’s a bit of a blow but for my needs, 10-15fps video at good quality full frame is far better than 30fps reasonable quality and cropped. While my article specifically states MJPEG at 30fps is achievable, I should state that it’s only achievable if you can stomach the cropping done when you specify width and height as 1920×1080. As I said, my needs are (now anyway) slightly different. I want full frame (width more than height), good quality streaming. 10-15fps is something I can live with and I don’t care how much bandwidth it uses (it’ll be a lot!) and so, I landed on the following configuration to give me what I need.
First, edit /etc/modules to show the following:
|
1 |
bcm2835-v4l2 max_video_width=2592 max_video_height=1944 |
Then I have a bash script called videostream.sh:
|
1 2 3 4 5 6 7 8 9 10 11 12 13 14 |
v4l2-ctl --set-fmt-video=width=2592,height=1944,pixelformat=5 v4l2-ctl -c compression_quality=100,sharpness=30 v4l2-ctl -p 10 #frames per second cvlc --no-audio \ v4l2:///dev/video0 \ --v4l2-width 1920 \ --v4l2-height 1440 \ --v4l2-chroma MJPG \ --v4l2-hflip 1 \ --v4l2-vflip 1 \ --sout '#standard{access=http{mime=multipart/x-mixed-replace;boundary=--7b3cc56e5f51db803f790dad720ed50a},mux=mpjpeg,dst=:8554/webcam.mjpg}' \ -I dummy |
So, it all looks very simple really but what we’ve done is (on boot) load the v4l2 driver and set the video height and width to their max supported by the Pi camera module. Then, in the videostream.sh file, I’ve set the video format to the same max resolution and set the pixelformat to 5 (MJPEG). I’ve then set sharpness, compression quality to max (ie. no compression) before finally setting the frames per second to just 10. Yes, 10fps is low but higher frames per second require more bandwidth for live streaming and since I want to use WiFi, 10fps is a good trade off.
Then comes the VLC command. The important bit here is to set the width and height to 1920×1440 as that will give you the full frame of the sensor. The rest should be obvious but I’ll point out that the –sout parameter is used to create the MJPEG stream. Don’t attempt to transcode, you’ll bury the CPU.
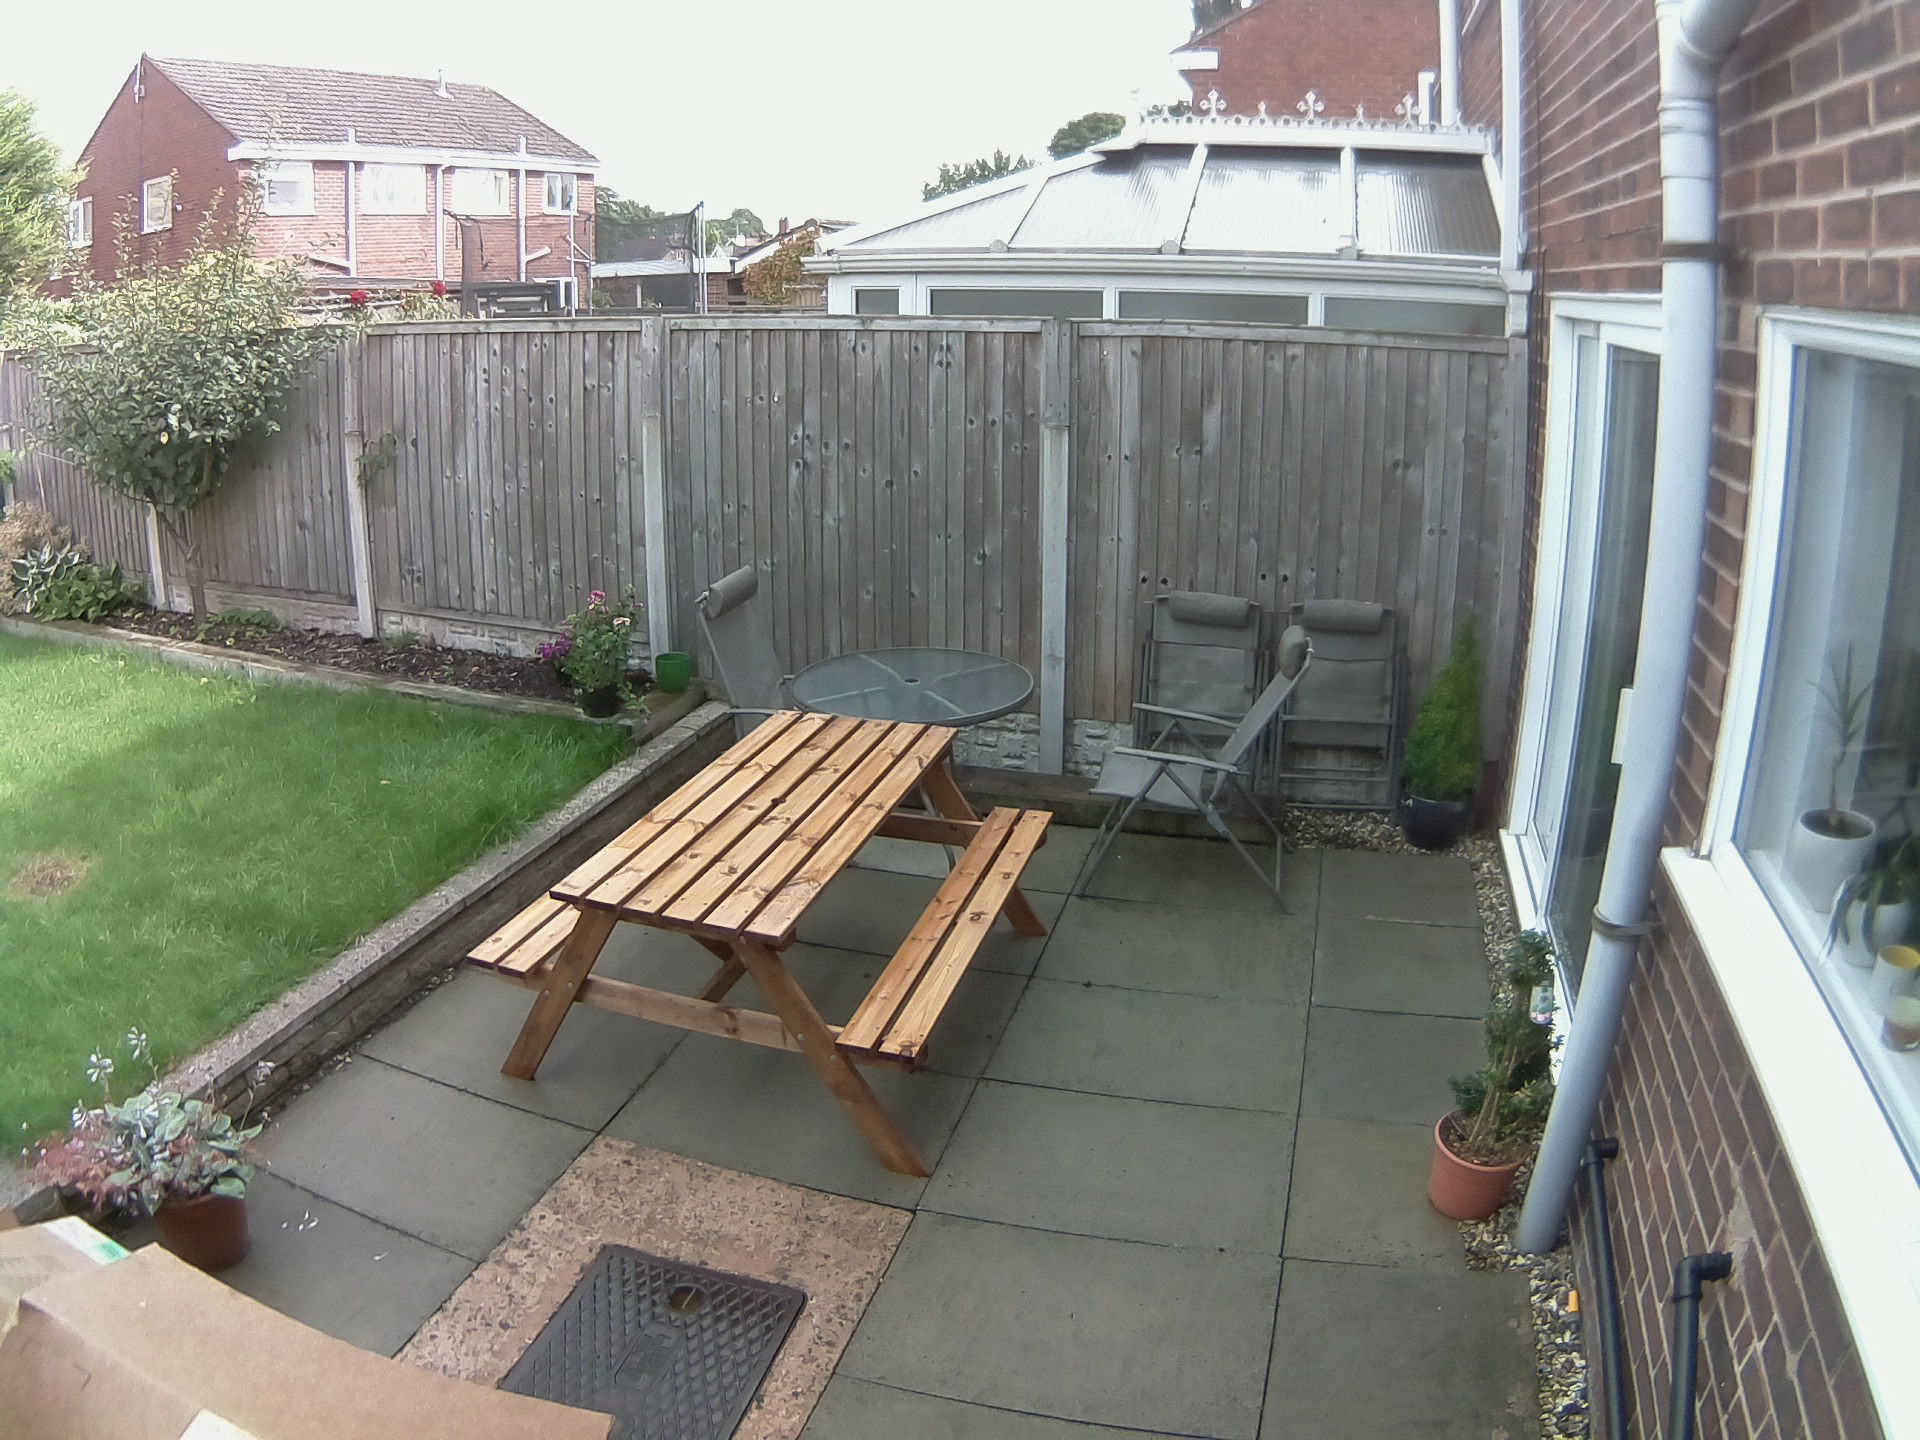
When you connect to the stream with VLC from a workstation, you’ll see that you get the full frame of the sensor in 4:3. Yes, the FPS is low but I’m going for quality. Here’s the view when we specify the width and height as 1920×1080. It’s zoomed in and cropped but the quality is good. Click the files to see the full resolution versions.
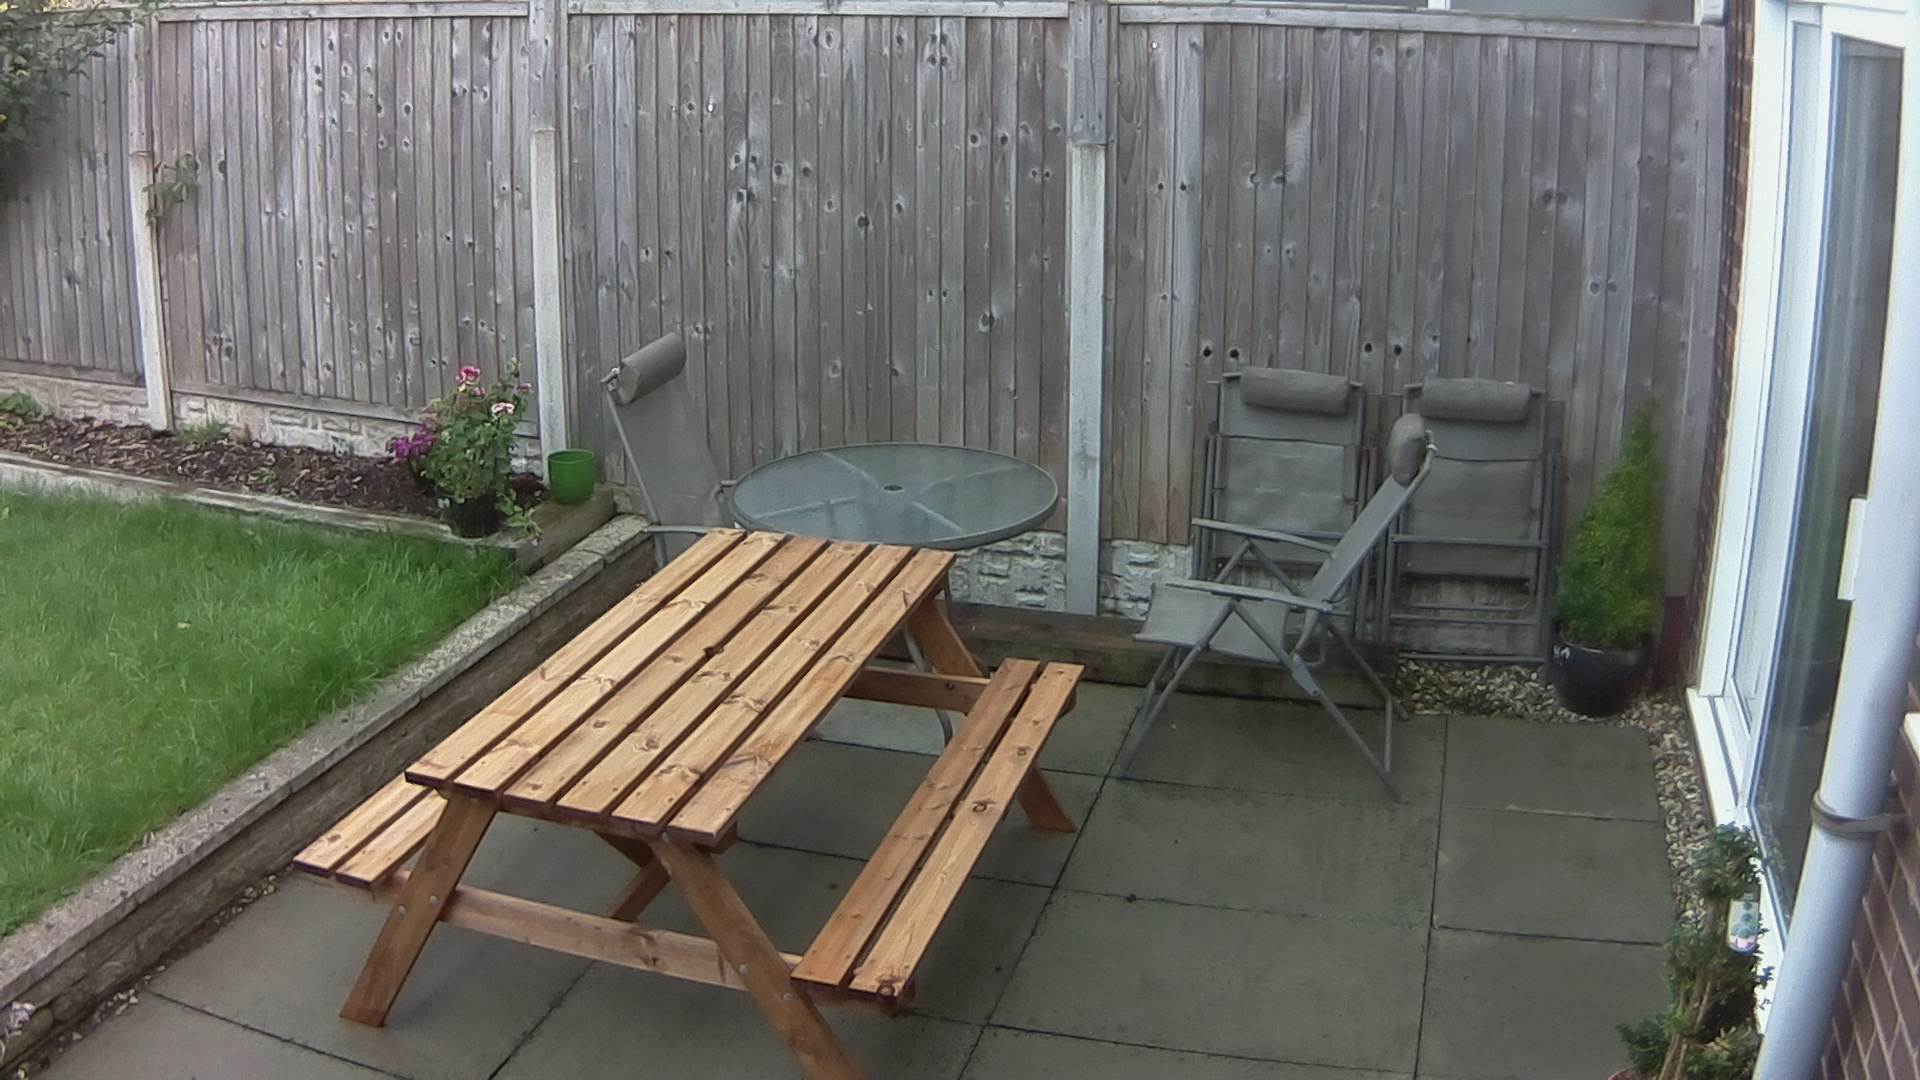
And now at 1920×1440. No cropping done, same great quality.
Great, full sensor, high quality. One potential drawback: it’s 4:3. Well, here’s where I cheat a little. I use VLC to connect to the stream and essentially just crop the image in the viewer to give me 16:9. I retain the full frame width that I want but crop out the top and bottom from the 1440 height to give me 1080. You can choose to do it each time you manually connect to the stream or, set up a shortcut that’ll do it for you thus:
|
1 |
vlc.exe -crop=16:9 http://<raspi_ip>:8554/webcam.mjpg |
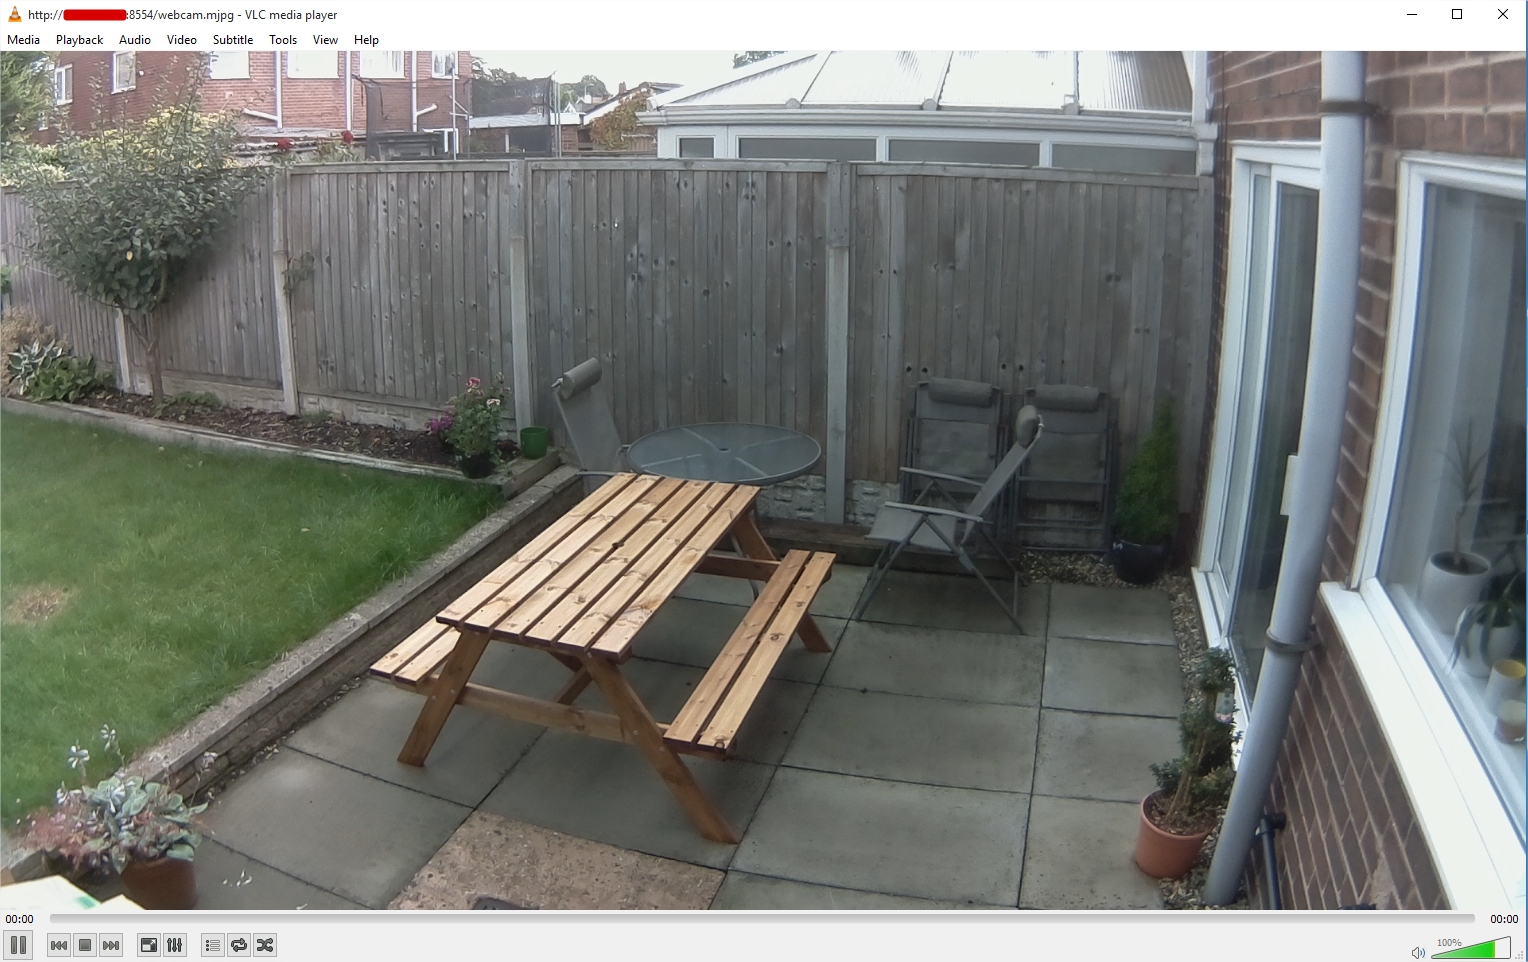
After I connect to the stream, I get this at 10fps: (sorry, I tried to take a snapshot at full resolution from VLC but it kept crashing. I assume because it was cropped.) As you can see, we now get the full frame width but are restricting our view to 1080p – which is what we should get when we specify 1920×1080 – at least in my opinion it is.
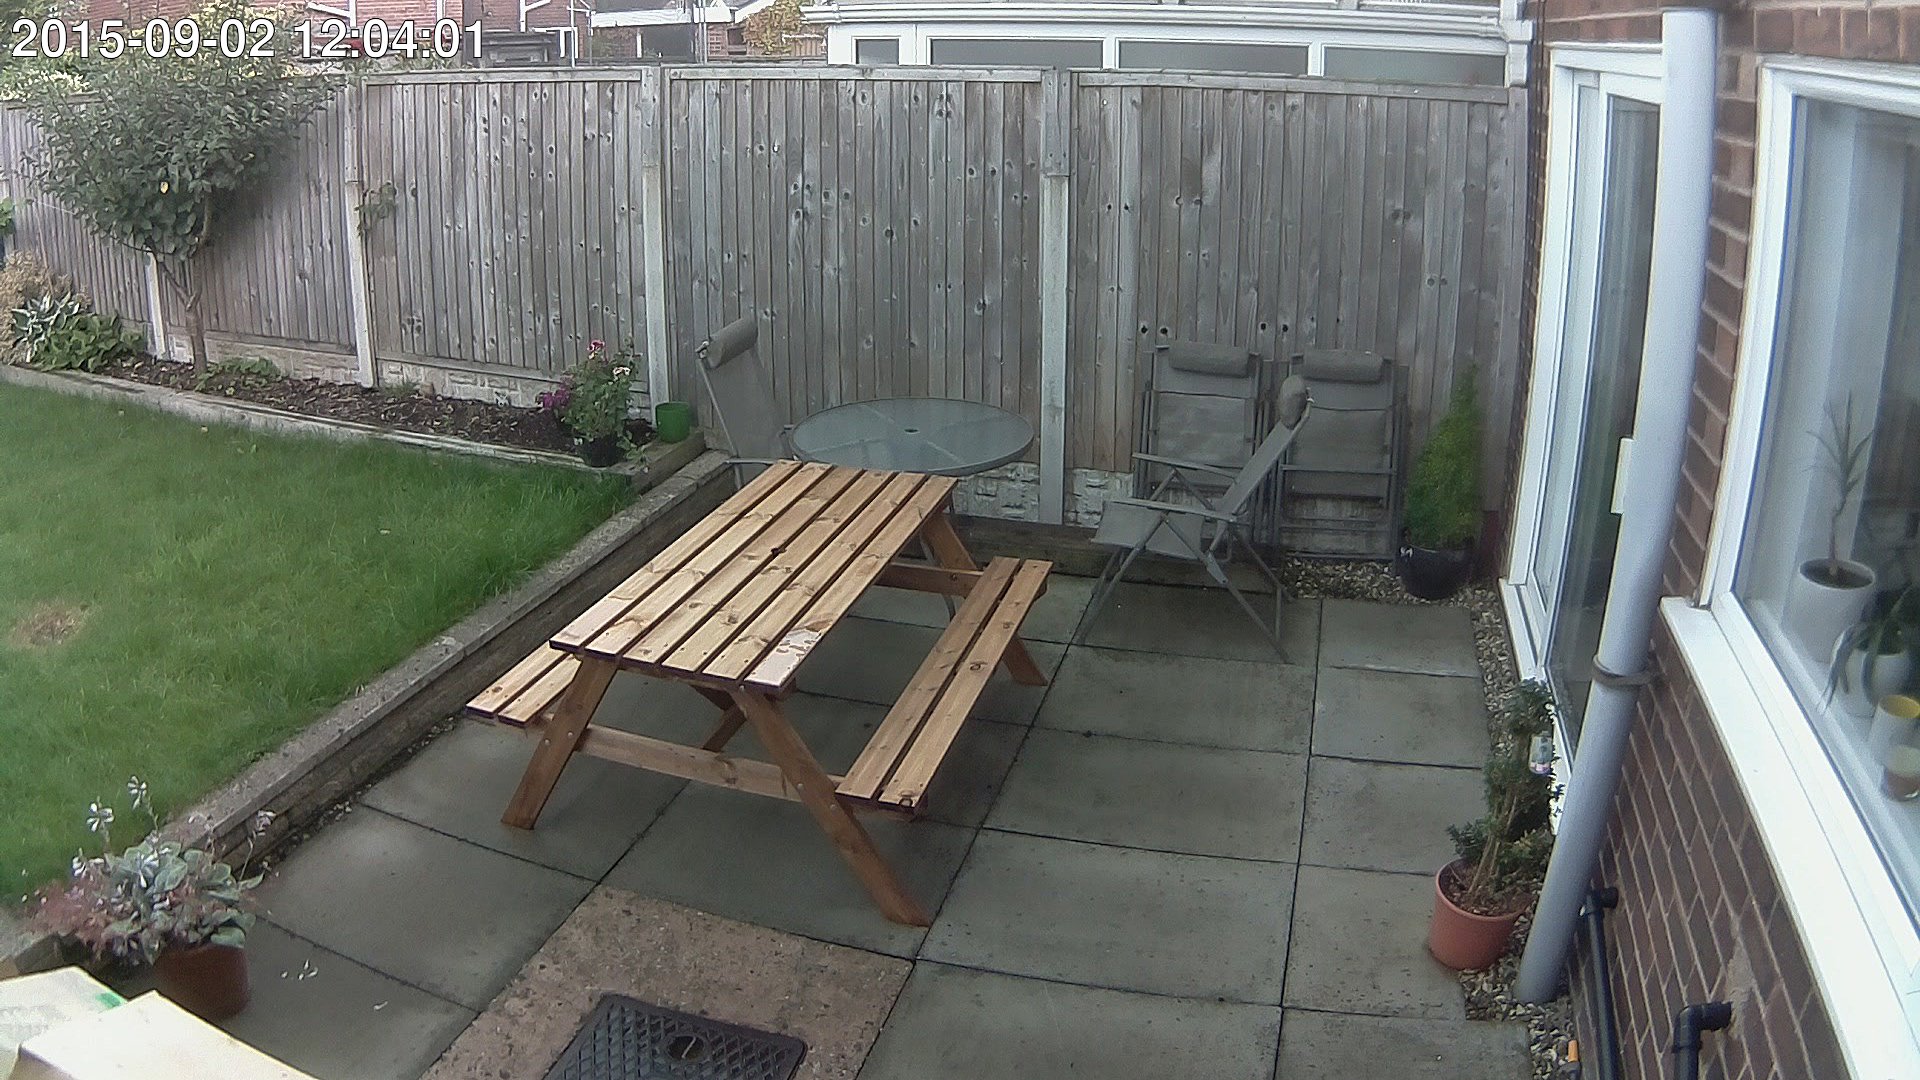
I mentioned that I also like to take screenshots each minute from the camera. I wrote a shell script that uses ffmpeg to grab a single (high quality) frame from the camera each minute and then uses ImageMagick to add a date stamp, crop it to 16:9 and add some quite heavy sharpening. I then use curl to upload those frames to my FTP for viewing on a website I use as my home page. Since ffmpeg connects to localhost, there’s no bandwidth constraint (in terms of network bandwidth anyway) so the result is exactly what I’m after.
|
1 2 3 4 5 6 7 8 9 10 11 12 13 14 15 16 17 18 19 20 21 22 23 24 25 26 27 |
#!/bin/bash # Get the date now d=`date +%Y-%m-%d-%H%M%S` d2=`date '+%Y-%m-%d %H:%M:%S'` # Remove the -f MJPEG if using h264 streaming ./ffmpeg -f MJPEG -y -i http://localhost:8554/webcam.mjpg -r 1 -vframes 1 -q:v 1 /var/www/camera/temp.jpg # Add the date and time, sharpen and crop to 1080p convert /var/www/camera/temp.jpg \ -crop 1920x1080+0+250 \ +repage \ -sharpen 0x1.5 \ -gravity NorthWest \ -font FreeSans-Bold \ -pointsize 52 \ -quality 85 \ -fill white \ -stroke black \ -strokewidth 1 \ -annotate +10+10 "$d2" \ /var/www/camera/now.jpg # Upload the image to the FTP with the date stamp and upload it for viewing. curl -T /var/www/camera/now.jpg -u user:password ftp://ftp.domain.com/daily/images/{$d}.jpg curl -T /var/www/camera/now.jpg -u user:password ftp://ftp.domain.com/now.jpg |
Each minute, an image such as the one below is uploaded to my FTP. I can use it for both timelapse video and security (well, to some extent). NB: The eagle eyed among you will notice that the resulting image uploaded to my FTP looks slightly different to the image seen when viewing the stream and cropped to 16:9 – there’s a little more of the bottom of the frame and less of the top. The reason for that is the way I’m cropping in the convert command. I’m telling it to crop to 1920×1080, 0 from the left but 250px from the top. The reason I’ve done that is to give me that little more of the bottom of the frame than the top since it’s likely to be more useful to me. If I wanted it centred exactly as per the stream view, I’d have used -crop 1920x1080+0+180 . Why? 1440 – 1080 = 360 / 2 = 180.
-Lewis


Did you try on this on the original Pi?
Can you save to SD card as MJPEG instead of streaming? What speeds can you get if you have?
I wanted to try the MIT motion magnification and they recommend using MJPEG as it does not use intra frame dependencies.
Thanks.
Rich Shumaker
Hi Rich, I’ve got a couple of Raspberry Pi 2 – I only got in to the Pi when I heard about the extra grunt that the Pi 2 had so unfortunately I’ve never tried this on the original Pi.
Honestly, I’m not sure that you’ll get it to record to the SD card at that rate. Most of the Class 10 SD cards can only just manage 40Mbps.
Apologies I can’t be much help here. My Pi’s are out of reach of me right now.
Oh, I should add, if you want to give it a try yourself, you’ll need to fettle with the information after
I’ve been looking for a solution exactly like this, for months. I was using MotionPie for awhile, but the image quality is horrible. RPi Cam Control was also a really nice option, but the settings are crazy and I spent hours just trying to do basic things. So your method is awesome and elegant. The only thing I’m looking for is to save a jpeg every 20 seconds instead of every minute. Which option would I change in ffmpeg to achieve this?
Thanks!
Hi Franklyn, thanks for the positive comments. This admittledy has been quite a journey just to get the quality (and field of view) I show in the final image of this updated post. The script that I use to grab the stills from the camera is simply executed from crontab so you wouldn’t make any changes to the script itself. Unfortunately crontab doesn’t do sub-minute executions so once per minute is the best frequency you can get without fettling it a little. This chap suggests a solution to add the script to crontab twice but make it sleep before executing. http://stackoverflow.com/questions/9619362/running-a-cron-every-30-seconds. In your case, to get it to run every 20 seconds, you’d add the script to crontab three times.
To get to crontab run this at the command line.
My crontab looks as follows:
To get what you want and if I were to change mine, it would look like this instead:
Hope that’s useful for you.
-Lewis
Thanks so much! I’m going to try it out asap.
Thanks again,
Franklyn
Are you just using the stock Raspberry Pi Camera Module or a USB Webcam? Its hard to tell from the post.
It’s the stock module but with a different lens. ☺
Sorry for my ignorance here, but had a question regarding this command. I’m using this for an aircraft application where my heads up display on the ground station only works with the MJPEG format (overlays flight metrics ect…), and since the stock RPi Cam Module is so light, it is perfect for my particular needs.
That said, thank you for doing the leg work on getting this working, I’ve been trying to find a post where someone could get a high frame-rate with the stock RPi camera and is streaming it, not just saving it to the SD card.
When I run the command (modified slightly for my own needs) I get quite a few errors. Maybe you can make sense of them. Here’s the command I run:
cvlc –no-audio \
v4l2:///dev/video0 \
–v4l2-width 1920 \
–v4l2-height 1440 \
–v4l2-chroma MJPG \
–v4l2-hflip 1 \
–v4l2-vflip 1 \
–sout ‘#standard{access=http{mime=multipart/x-mixed-replace;boundary=–7b3cc56e5f51db803f790dad720ed50a},mux=mpjpeg,dst=:8084/}’ \
-I dummy
And here’s the errors I get:
VLC media player 2.0.3 Twoflower (revision 2.0.2-93-g77aa89e)
[0x19f8e18] inhibit interface error: Failed to connect to the D-Bus session daem on: Unable to autolaunch a dbus-daemon without a $DISPLAY for X11
[0x19f8e18] main interface error: no suitable interface module
[0x76600d48] main interface error: no suitable interface module
[0x196d8f0] main libvlc error: interface “globalhotkeys,none” initialization fai led
[0x1a01b38] dummy interface: using the dummy interface module…
Any ideas? I don’t have a display connected (streaming over network only), could that be the problem?
Hi Jeremy, gald this could help you. I’d wager that’s because there’s an existing vlc.exe process (or something else) using the camera.
If you don’t want to reboot use the “top” command on your Pi to see if anything else is running that could be accessing the camera – could be an abandoned vlc.exe process or raspivid/raspistill. Anything that attaches to the camera module will have dedicated access and any other process will get an error.
Let me know how you get on.
-Lewis
I got it working, and now it streams to my Windows 7 VLC without issues.
Problem is it STILL doesn’t pipe into my ground station HUD which only supports the mjpeg format.
I have some other webcam feeds that I can successfully pipe directly into my ground station HUD (but those just use mjpg_streamer … really bad quality and fps).
Most people it seems are using a capture device and re-streaming the video using dshow// in the VLC GUI (guide here http://vps.oborne.me/gcs/Mjpeg%20Video%20Source%20with%20VLC.htm).
Since the video stream I get from the Raspberry Pi (using your command) doesn’t work directly in the ground station HUD like my mjpg_streamer videos do, I thought I would follow the HUD developer’s suggestion and try to re-stream it again using the Windows VLC GUI in that guide.
Instead of using dshow in VLC however since I’m not using a capture device, I’m just re-streaming the video from my Raspberry Pi Cam using your command above (for me that is http://192.168.2.250:8084). When I try to re-stream the Raspberry Pi output in VLC on my Windows 7 desktop to another port (8085) as in the guide, it just crashes the windows VLC GUI. The command I end up with after setting up VLC in the GUI as the guide suggests is:
:sout=#transcode{vcodec=MJPG,vb=800,scale=1,acodec=none}:http{mux=mpjpeg,dst=:8085/} :sout-keep
I didn’t think this would be so complicated as all my other video streams work using mjpg_streamer… the command I use with mjpg_streamer that actually works in the HUD is:
/usr/bin/mjpg_streamer –input “input_uvc.so $yuv –device $device –fps $fps –resolution $resolution” –output “output_http.so –www $www –port $port $auth”
where I’m using a config file to specify all $ options.
Any advice? Appreciate any help 🙂
Hi Jeremy, sounds like a cool little project you have on here. I get where you’re coming from with re-streaming it, that makes sense and it’s frustrating that it just crashes VLC. I have recently been tinkering with another little project of mine that’s kind of like a home intranet web application and one of the features is a proxy written in PHP for an MJPEG stream from one of my webcams. That webcam is a Samsung SNH-E6440BN and it only manages 2-3fps in MJPEG mode 1920×1080 at the best of times so it doesn’t really stress the proxy. I haven’t actually got to the point of extending it to use the Pi (which I’m having terrible longevity/reliability issues with currently) so you’re welcome to try it. As I mentioned, it’s written in PHP and uses the cURL extension (of PHP) and is actually quite basic in functionality so it shouldn’t be too much to wrap your head around.
I’d be interested to see if this would execute inside the Pi using its own install of PHP/Apache or if it just buries the CPU. It isn’t doing any transcoding, just regurgitating what it receives from the MJPEG stream. If the reason your HUD isn’t displaying the stream is related to a format issue, like the MJPEG stream isn’t valid or something, this could give you an extra level of control that you don’t have with VLC.
Let me know how you get on! Code follows:
I should add that there’s stuff in there like authentication etc. that you won’t need. I’m interested to hear how you get on so do keep me updated and I’ll see if I can find something like an MJPEG stream validator to see if what my command is putting out is considered a valid MJPEG stream and VLC is just being kind by playing it.
Jeremy, I just had a thought – I remember when i was tinkering with this that I had to specify the forward slash ‘/’ after the stream or VLC simply wouldn’t play it. I think that’s why I ended up specifically outputting it to webcam.mjpg in the end because I kept forgetting the slash. My final code for the output is:
It’s playing fine for me in VLC without the / at the end, the problem is when I am trying to re-stream the video it crashes the VLC gui. I had hoped that this command would output an mjpeg and that I wouldn’t have to re-stream.
Because the ground station HUD plays the video from mjpg-streamer I mentioned earlier (off a webcam) no problem and the cvlc command doesn’t, there has to be something different with the video format that is output that it doesn’t like. One idea I had is to look at the packets with Wireshark as a “verification” but after that I’m out of ideas.
I agree, a single stream would be the preference certainly. MJPEG itself isn’t complex, it’s literally a stream of JPEG pictures, separated by a boundary with a Content-type of multipart/x-mixed-replace sent at the outset. So long as the client application can understand and decode this, it should work. That’s why you see the content type and boundary declarations in the cvlc command – there’s not a lot else to it and certainly no room for tinkering other than with the boundary but the boundary is just a marker to define the start and end of JPEG images (as the frames).
Can your HUD device deal with the size of the images being sent down in the stream? It may be worthwhile reducing image size, frame rate etc. to bring down throughput rates to those you get with mjpg streamer. VLC should give you information about the stream so check Tool > Codec Information to make sure it says Motion JPEG MJPG – I’m sure it does, it’s just another check. I’ve just had a read of this page too and it suggests using cURL to grab trace information from the stream (saves messing with WireShark).
http://pdn.pelco.com/content/mjpeg-http-push
-Lewis
Hello there! I wanted to thank you for your guide, it helped me tremendously. I had a few Pi1’s lying around & thought I could use them as front & rear house cameras.
I initially used MotionPie for my Pi Camera Module stream but I had to re-purpose a Pi2 to get between 7 to 10 fps @ 720p. 1080p was around 3-4 fps & zoomed in like you said.
After reading your guide I am now currently getting a stable & solid 15fps @ 720p streaming from a Pi1 with the Pi Camera Module.
I may even change back to the Pi2 to try for a 10fps 1920×1440 stream like yours. The quality would be nice.
For remote viewing of the cameras your FTP upload of an image script is more than enough for my needs.
For others with a Pi1, I used the following:
v4l2-ctl --set-fmt-video=width=1280,height=720,pixelformat=5
v4l2-ctl -c compression_quality=100,sharpness=30

v4l2-ctl -p 15

cvlc    --no-audio \
        v4l2:///dev/video0 \
        --v4l2-width 1280 \
        --v4l2-height 720 \
        --v4l2-chroma MJPG \
        --sout '#standard{access=http{mime=multipart/x-mixed-replace;boundary=--7b3cc56e5f51db803f790dad720ed50a},mux=mpjpeg,dst=:8554/}' \
        -I dummy
Thanks very much once again!
-Rodney
You’re welcome Rodney. I’m really glad it was useful for you. Sorry if you saw an error a moment ago, I’m currently tinkering on my server 🙂
I followed your directions and things worked but the speed it really slow. I am seeing about a 2 second lag along with maybe 5 fps on a Pi3.
What am I doing wrong?
I don’t know what I’m doing wrong. Your first example works – and nothing after it.
I’m able to take stills and video – so I know the camera works.
Update: I just submitted a comment/question on an error seen when implementing cvlc over VNC. I’m still getting the error – but I decided to fire up VLC on the receive side and see if the stream shows up and, sure enough, there it is. So apparently, the video is properly streamed. The error is still a curiosity … but at least not a show stopper!
This aligns actually with the very first comment in this thread. I’d like to write the 1920×1440 10 FPS video to a file (for ~10 seconds or so). I can stream across my network with the commands you suggest above just fine. So I updated the cvlc command as follows:
cvlc –no-audio \
v4l2:///dev/video0 \
–v4l2-width 1920 \
–v4l2-height 1440 \
–v4l2-chroma MJPG \
–v4l2-hflip 1 \
–v4l2-vflip 1 \
–sout=file/ts:filename.mpg
It saves to a file just fine. However, if I open the VLC gui on the RPi, nothing shows up. I can pull the mpg file over to my Windows machine and open it up in VLC. The upper half of the video frames play just fine. However the lower half of the frame seems frozen to the 1st frame captured.
Looking at the ‘Messages’ dialog in VLC – the following warnings show up:
avcodec warning: plane 0 not aligned
avcodec warning: disabling direct rendering
core debug: End of video preroll
core debug: Received first picture
hqdn3d debug: Changing coefs to 6.94 6.00 2.56 4.50
avcodec warning: cannot decode one frame (1777 bytes)
core debug: Decoder wait done in 201 ms
avcodec warning: cannot decode one frame (13009 bytes)
avcodec warning: cannot decode one frame (65500 bytes)
…
(it then proceeds to give a long string of not being able to decode one frame…)
I thought the problem might be the data rate – i.e. that the SD card write speeds could not keep up – so I slowed the feed to 5 FPS. However, the result is the same … or even worse! I tested the write speed of the SD card on my raspberry pi using the command:
sync; dd if=/dev/zero of=~/test.tmp bs=500k count=1024
and it comes in at about 10.4 MB/s (‘mega-bytes per second). Looking at task manager, when streaming, the required bandwidth is ~ 11 Mbps (‘mega-bits-per-second’).
So the SD card should be about 8x faster than required to keep up with the generated video stream.
Am I doing something wrong with my write-to-file command? Is there another way to write the generated video to a file on the pi (or record to file from another computer) given that the streaming is working fine?
I figured out what my problem was. I was using the wrong ‘muxer’. When I switched to using the ‘ogg’ muxer, I was able to write to a file just fine. For the record, the command that is working for me is as follows:
cvlc –no-audio \
v4l2:///dev/video0 \
–v4l2-width 1920 \
–v4l2-height 1440 \
–v4l2-chroma MJPG \
–run-time=10 \
–sout=file/ogg:/tmp/filename.mpg \
vlc:\\quit
Two things I added to this command are:
The ‘–run-time’ specifier to capture just a limited duration of video (10 seconds in this case).
The ‘vlc:\quit’ command at the end to close out vlc at the end and return control to the command prompt.
One other thing I did before capturing any video was to mount the /tmp folder to the tmpfs. Then, by writing to this folder partition, we write directly to RAM, eliminating the SD Card from the file-write process (just in case that was adding a bottleneck to the process).
Hello Lewis, I stumbled on the post because I have the same problem with MJPEG shrinking the field of view (FOV). I am using the software motion to record images whenever movement was detected.
The FOV changed after I did “bcm2835-v4l2 max_video_width=2592 max_video_height=1944”.
I know I can alter width and height via motion config or v4l2-ctl but both ways do not result in 2592×1944 images with a full FOV.
Here is a more elaborate explanation of the problem https://www.raspberrypi.org/forums/viewtopic.php?f=43&t=165028
Do you have a clue how to solve it? Cheers!
Hi Lewis,
thank you for detailed tutorial! One question about playing the stream – when I am streaming over wifi, VLC keeps disconnecting. I am playing the stream on PC and it disconnects after couple seconds and reconnects immediately after I press play button. Is it a way how to force VLC to keep connected? I tried to play with VLC setting, buffering, etc.. but id did not help.
Thank you,
Peter.