Configuring Azure Site-to-Site Connectivity using VyOS behind a NAT – Part 1
Introduction
This series of posts will cover the process of creating a Site-to-Site VPN from your on-premises network infrastructure in to Azure IaaS services using VyOS, hosted in a virtual machine. Typically, this results in the “hybrid” model that Microsoft are keen for you to take advantage of when you’re investing in your infrastructure. If you’re asking yourself “Why would I do this?” The answer is: to permit your business to take advantage of the benefits offered by cloud IaaS services such as giving you the ability to spin up virtual machines (VMs) quickly and easily, without the normal associated costs (in terms of both financial and time) typically involved in procuring the hardware, configuring, installing, licencing and finally, commissioning it. In short, if you want to add infrastructure to your existing network and you need it quickly, the cloud is the way to go. Think of the benefits of deploying development environments which can be spun down at the end of the day – no more power, cooling etc. to pay for and better still, you haven’t forked out for new (or had to recycle old) kit.
Yes, yes, but why are you doing this?
As a Microsoft professional, it’s in my best interests to get up to speed on Azure quickly since that is where most Microsoft platforms will likely be deployed in the years ahead. The only way to generally do that is through Technet articles and doing it myself, however, having a home centric internet connection, I’m saddled with a single IP address and limited resources. Throwing money away on blocks of IP addresses, VPN devices etc. to get experience of hybrid cloud models in Azure isn’t something I’m keen on. I needed a way to learn about hybrid cloud from my own lab, so I set about finding out if it was possible and wanted to share my conclusions with you here…long story short, I got it working.
Microsoft have their own documentation on how to set this up but it’s a little vague when it comes to setting up the on-premises side of things and they clearly state that the VPN device cannot be behind a NAT. Well, they’re wrong, it can – it just depends how the network is configured. For this series of posts, the intention here is to create an end-to-end solution using VyOS, an open source router OS that runs very happily on vSphere (and probably Hyper-V) which will host the IPSec site-to-site VPN (it will connect to Azure). I’ve been using VyOS to route between my home lab (hosted on VMware ESXi 5.5) and my main (“everyone’s phones are on it” network) for nearly a year now and it has served this very basic purpose beautifully. I discovered that Vyatta Community Edition was to be discontinued when Vyatta was acquired by Broadcom but thankfully for all of us, someone had the foresight to fork Vyatta and create VyOS.
A word of warning…
There is however a limitation with VyOS and Azure and that is in its ability to support only Static Routing Virtual Private Network Gateways on Azure – in short this means you can only have a single Site-to-Site connection, ie. One site is Azure, the other is your premises. If you add a second site and want to attach that to the same Azure Virtual Network, you’ll have to consider something other than VyOS. In technical terms, VyOS does not support
Perfect Forward Secrecy using Diffie-Hellman Group 1 for IKE Phase 2. Obviously, given that this solution is geared toward me and my home lab, and hopefully you and yours, this rather cheap solution works very well.
Starting Off
So, it’s best to start off with a network diagram showing what we’re starting with. This is basically my home network as it was before I did anything with Azure. I should point out that this is a single IP address, home connection. My ISP also gives me a dynamic IP, just to make things harder but thankfully, the IP doesn’t change very often. The diagram below is, of course, logical. In essence, it’s a little like a typical back-to-back DMZ configuration however there’s no ACLs configured to prevent traffic flowing from one network to the other and there’s no NATing done on the VyOS device at all. I do have other PCs, wireless devices etc. attached to the 192.168.1.0/24 network. The edge router performs NATing for both the 192.168.1.0/24 and 10.0.0.0/24 networks (more on this in a second…)
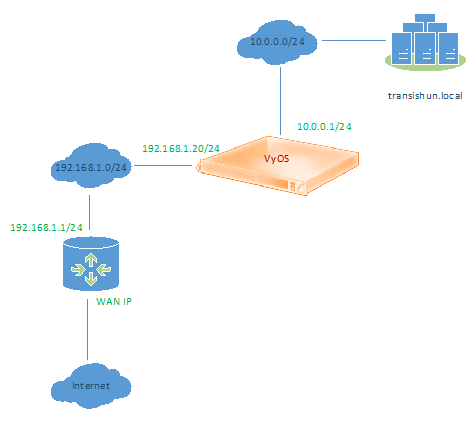
How did you do that?
I’m going to explain this very briefly for those that are interested – as a bonus it serves as a reminder for me should I need to reconfigure this again at some point in the future. Don’t get bogged down in the technicals of my own network configuration – the important bit for you is the logical diagram above.
ESXi Configuration
VyOS is a piece of software, like an operating system and it must be installed on a computer (something with a CPU, RAM and Disk) – this can be a virtual machine. In my case, the guest virtual machine which is running VyOS resides on an ESXi 5.5 host – it could just as easily run on VMware Workstation on a PC or Hyper-V. Since VyOS is a router, it is assigned two NICs (you can’t route anything without two NICs!). The first NIC (eth0) is attached to the 192.168.1.0/24 network, along with everything else. The second NIC (eth1) is attached to a vSwitch where all the VMs (that make up my on-premises transishun.local domain) have addresses in the 10.0.0.0/24 address range are also attached (strictly, eth1 forms the 10.0.0.0/24 network once it’s configured in VyOS).
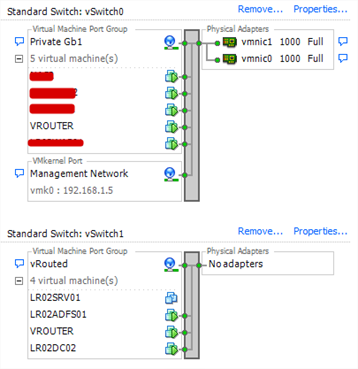
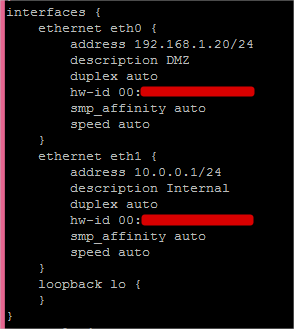
Basic VyOS Interface Configuration
In VyOS, I configure eth0 with the 192.168.1.20/24 IP address and I configure eth1 with the 10.0.0.1/24 IP address using the following commands.
- set interfaces ethernet eth0 address ‘192.168.1.20/24’
- set interfaces ethernet eth0 description ‘DMZ’
- set interfaces ethernet eth0 duplex ‘auto’
- set interfaces ethernet eth0 smp_affinity ‘auto’
- set interfaces ethernet eth0 speed ‘auto’
- set interfaces ethernet eth1 address ‘10.0.0.1/24’
- set interfaces ethernet eth1 description ‘Internal’
- set interfaces ethernet eth1 duplex ‘auto’
- set interfaces ethernet eth1 smp_affinity ‘auto’
- set interfaces ethernet eth1 speed ‘auto’
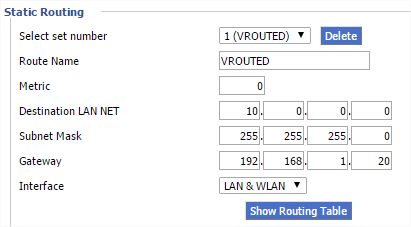
Edge Router Static Route Configuration
So that machines in the 192.168.1.0/24 network can route to the 10.0.0.0/24 network, the edge router has a static route declared as per the screenshot below.
VyOS Static Route Configuration
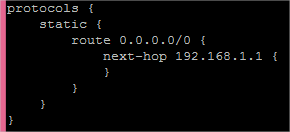
Similarly, the VyOS software router has a default static route declared (0.0.0.0/0) so the 10.0.0.0/24 network knows how to get out to the Internet (via the edge router). This command, executed on the VyOS software router gives us the configuration setting shown in the screenshot below.
- set protocols static route 0.0.0.0/0 next-hop ‘192.168.1.1’
Giving 10.0.0.0/24 Internet Access
Just before the diagram, I mentioned that my edge router performs NATing for both the 192.168.1.0/24 and 10.0.0.0/24 networks. How? Well, the router’s software is based on DD-WRT which provides it with a little extra capability however, by default, even DD-WRT will only perform source NAT for the primary network on the LAN interface – in my case, that’s 192.168.1.0/24 so, in order to persuade it to do source NAT for the 10.0.0.0/24 network as well, it was necessary to execute the following command on the edge router. This command requires DD-WRT of course. Arguably, you do have the option to configure masquerade source NAT on the VyOS to avoid the need for this command but I despise double-NAT and wanted to avoid it at all costs.
- iptables -t nat -I POSTROUTING -o
get_wanface-j SNAT –tonvram get wan_ipaddr

Once everything above is in place, you should be able to route from clients in the 10.0.0.0/24 network to the Internet. If you’re struggling to grasp everything going on in my network configuration, just look at the very first diagram and get your head around that.
End Result
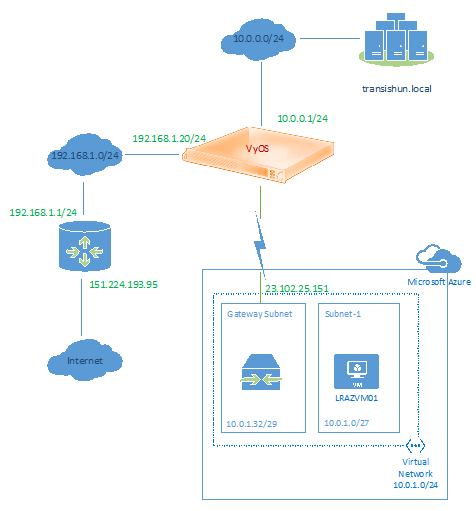
The following diagram shows what we expect to end with so you can come to terms with what the network will look like once it’s configured and the Site-to-Site VPN is operational.
In part 2 of this series, I’ll turn my attention to Azure and describe the process of configuring the Virtual Network Gateway, local networks, DNS and the like.
In part 3 of this series, I’ll use the information gathered during part 2 to configure VyOS to form up the Site-to-Site VPN connection.
In part 4 of this series, I’ll configure a VM hosted in Azure and add it to my on-premises Active Directory and prove connectivity.


Thanks very much, this helped me get my vyos to Azure VPN up and running.
My network is a little differnt and I needed to specify:
nat-traversal enable
before it would work.
Cheers,
Rhys
Hi, Thanks for your article. I am trying to set the same setup using your blog series. But my home router don’t have DD-WRT.
you mentioned “Arguably, you do have the option to configure masquerade source NAT on the VyOS to avoid the need for this command but I despise double-NAT and wanted to avoid it at all costs.”
If I still setup a NAT on vyos, something like below
set nat source rule 10 outbound-interface ‘eth0’
set nat source rule 10 source address ‘192.168.125.0/24’
set nat source rule 10 translation address ‘masquerade’
Eth0 – DMZ (where devices connected to home router)
Eth1 – Internal (My domain controller, lab machines sit)
Will it work? Do I need to follow special instructions anywhere?
I managed to make it work. Since I am using NAT on Vyos, I need to exclude that NAT for Site to Site VPN to work.
Step 7 on this article explains that https://support.rackspace.com/how-to/configure-a-site-to-site-vpn-using-the-vyatta-network-appliance/
Thank you very much for such useful blog.
Is this possible when you have VNETs behind a Virtual WAN? I have to migrate hundreds of client VPNs to Azure and will need to NAT.